Invoices in Sonar: Examples, Creation & Contents

Written by Mitchell Ivany
Updated at March 12th, 2025
- Our Products & Services
- Getting Started
- Accounts
- Communication
- Billing
- Companies
- Financial
- Integrations
- Inventory
- Jobs
- Mapping
- Misc.
- Monitoring
- Purchase Orders
- Release Notes
- Sonar Billing
- Voice
- Reporting
- Security
- sonarPay
- Ticketing
- Working With the Sonar Team & Additional Resources
- System
- Networking
Table of Contents
.png)
Invoice Configuration
Invoice configuration is handled at the company level, meaning that each company can have their invoice setup customized to suit its needs. These invoice settings are available to you when creating a new company within your Sonar instance, or when editing an existing company.
To Access a Company's Invoice Configuration
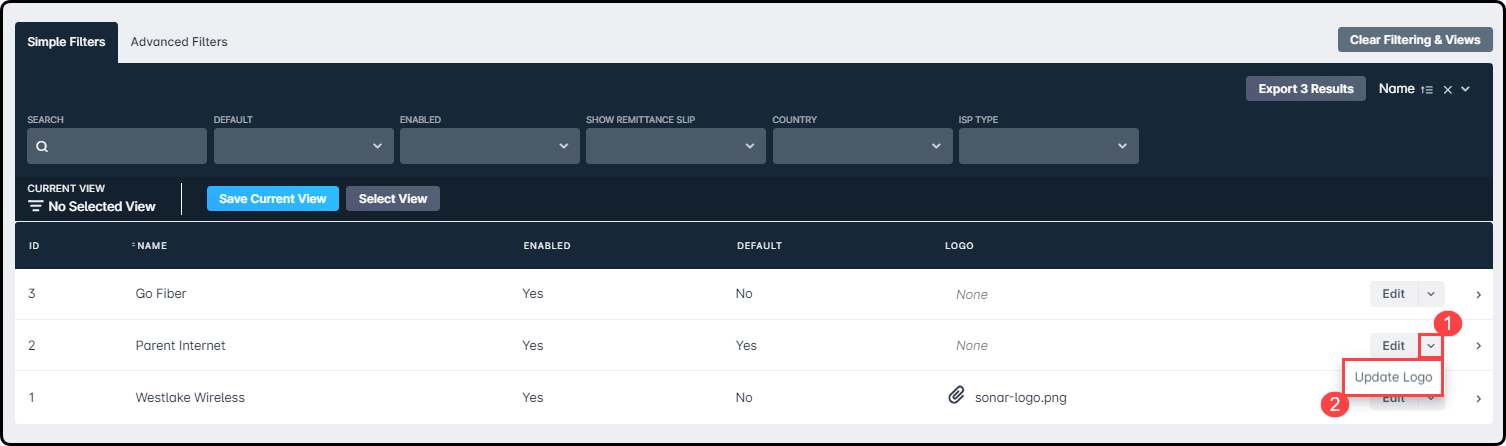
- Navigate to Settings → Companies.
- If the company already exists in the instance: click “Edit” for the company
- If the company needs to be created: click “Create Company”
Whether you are completing the invoice configuration from within the Create Company window or the Edit Company window, the fields you interact with will be the same. A breakdown of these fields is provided below to outline where and how this information is displayed on the actual invoice.
Invoice Contents & Appearance
In Sonar, invoices typically consist of two pages:
- The first page: displays most of the company's information, allowing for customization through configurable fields.
Expand to view the first page of an invoice
- The second page: used to list a breakdown of the transactions included in the invoice.
Expand to view the second page of an invoice
Invoice Breakdown of Configurable Fields (1st Page of Invoice)
An example invoice generated from within Sonar is provided below. For each numbered item, expand the 'Where to Configure' section to learn where in the Edit Company or Create Company window these specific fields correspond to.

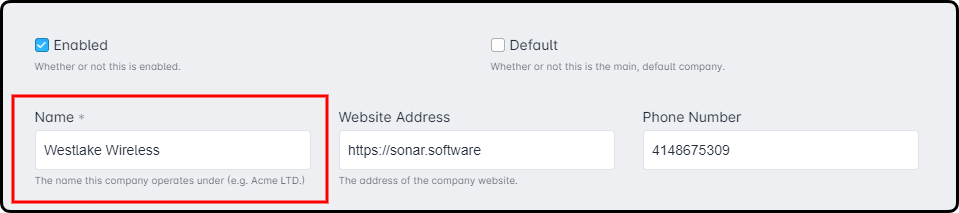
- Company Name: the name the company operates under.
Where to Configure

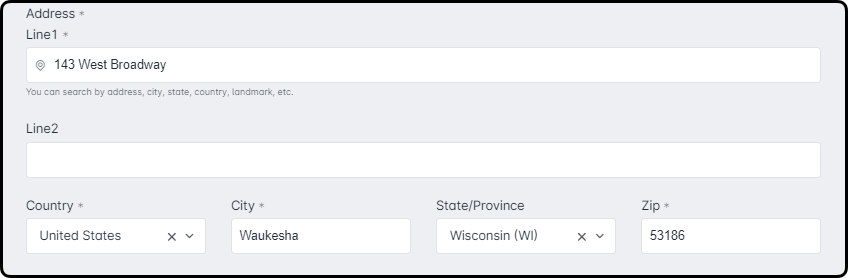
- Company Address: the address of the company.
In accordance with USPS postal addressing standards, if a line 2 is present (for either the company address or customer address), it will appear appended to line 1 of the address.


Where to Configure

- Company Logo: the company logo.
Where to Configure

The system will accept any image under 2 MB, however, when appearing on invoices the optimal image size is 230 × 100 pixels.
- Service Period: on monthly generated invoices, the service period will display the date range that the invoice is regarding.
This section does not display on manually generated invoices; these invoices will only reflect the invoice date and the due date.
- Custom Fields: any account-level custom fields will be displayed here, but will only be displayed for accounts that have a value for the field (i.e., in our above example, if we did not have the value 'Tony Stark' set for the Account Manager field then this section would not appear).
Where to Configure

To learn more about custom fields and how you can create them, take a look at the Custom Fields Overview & Use Cases article here.
- Invoice Message: if an invoice message is configured, it will be displayed here. If, however, you manually create an invoice and use the 'Print Message' feature, the print message will override the existing invoice message.
Where to Configure
For a more in-depth look at invoice messages and how they can be configured, refer to the Invoice Messages: Overview & Use Cases documentation here.
- Remittance Slip: if enabled, this will automatically include a detachable remittance slip on the invoices, to provide your customers with information on whom to make checks payable to and space to disclose the amount. If disabled, this bottom half section of the invoice will be blank. An example of an invoice with no remittance slip can be downloaded here.
The below fields (#'s 7 - 14) are for the remittance slip, and will only appear on the invoice if the Show Remittance Slip field is enabled.
Where to Configure

If you have the remittance slip enabled for invoices, and the customer has a payment method set to autopay, the Amount Enclosed field will display the scheduled autopay date.

This will only occur for invoices that are generated automatically, as a result of billing running; if the invoice is generated manually, this will not appear.
- Late Fee Warning: if you have configured late fees, a warning message will be displayed here. This is used to inform the customer that a late fee will be applied on past due invoices, as well as the amount they can expect to be charged, if late.
Where to Configure
For a more in-depth look at late fees and how they can be configured, refer to the 'Late Fee & Printed Invoice Fee Management' section of the Billing Settings article here.
- Checks Payable To: this field is used to provide your customers with the company name that they should make checks payable to. This allows you to have a distinct company name in Sonar, while having the legal business name on the invoice.
Where to Configure

- Company Logo: the company logo will be visible here on the remittance slip section as well, but only if the remittance slip is enabled.
Where to Configure


The system will accept any image under 2 MB, however, when appearing on invoices the optimal image size is 230 × 100 pixels.
- Company Name: the name the company operates under (same as #2 above).
Where to Configure
- Company Address: the address of the company (same as #1 above).
In accordance with USPS postal addressing standards, if a line 2 is present (for either the company address or customer address), it will appear appended to line 1 of the address.
.png)
.png)
Where to Configure
- Tax Identification: used to provide customers with the company's tax identification number.
Where to Configure

- Phone Number: the phone number of the company.
Where to Configure

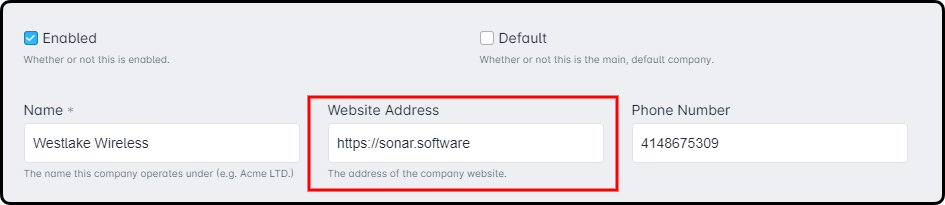
- Website Address: the address of the company's website.
Where to Configure
Invoice Breakdown of Transactions Page (2nd Page of Invoice)
An example invoice generated from within Sonar is provided below. For each numbered item, details will be provided on where this information is being pulled in from.

- Charges: this is where all charges for the invoice will be displayed, with each service and any associated tax appearing as line items.
- Service & Quantity: the name of the service and the quantity of the service that the customer is being charged for.
The name of the service will appear on the invoice exactly as it is displayed within your Sonar instance, unless a name override has been applied to the service.
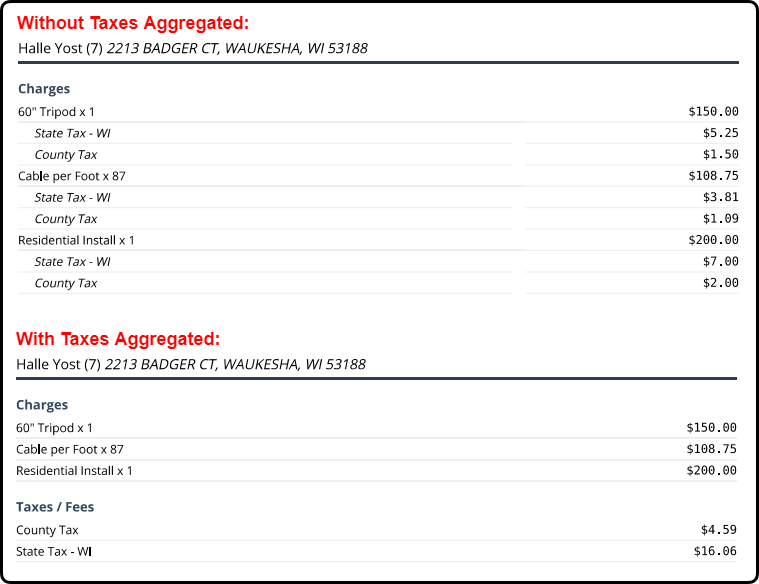
- Taxes: If there are any applicable taxes, they will appear as a line item underneath the corresponding service.
Aggregate Taxes On Invoice
- Amount: The amount for each individual line item will appear on the right side; this is the amount that the customer is being charged or credited.
- Payments Applied: If credits are applied to the invoice and those credits are a result of a previous payment being made on the account but not used (i.e., the amount was stored as Available Credit), they will be listed here by the payment method and the date the original payment was applied to the account.

- Credits Applied: If there is any service applied to the invoice that results in a credit (i.e., an adjustment, a recurring credit, etc.) it will be listed here by the name of the associated service.
- Child Invoice: If the account has any child account(s), the transactions for the linked child invoice will be listed here as well.
If your customers have Voice Services
Invoice vs. Statement Mode
In Sonar, the bill that customers receive can be in one of two formats:
-
Invoice mode: this format will only contain transactions that are explicitly associated with the invoice itself.
This means that:- Within the summary box, the 'total due by' amount will only reflect the total of that specific invoice.

- The transactions listed on the 2nd page will only reflect the transactions specific to this invoice.

-
Statement mode: this format will contain transactions that are explicitly associated with the invoice itself, in addition to any prior balance information.
This means that:- Within the summary box, the previous balance will be listed and the 'total due by' amount will reflect any prior balance.

- The transactions listed on the 2nd page will include both the transactions specific to this invoice, in addition to any prior unpaid invoices. For prior unpaid invoices the invoice ID, the date the invoice was created, and the total amount due on that invoice will be displayed.

Setting a Customer's Bill Mode
Each customer can have their preferred bill mode set at the account level. To set or edit a customer's bill mode:
- Navigate into the “Billing” tab for the account
- Click into the “Billing Configuration” sub-tab
- Click “Edit” above the Billing Detailed section
.png)
- From within the Edit Account Billing Parameters window, use the Bill Mode field to select either “Invoice” or “Statement”

- Click “Save”
For all invoices generated for an account, you will also have the options to:
Download Invoice: this will download a PDF version of the bill in invoice mode.
Download Statement: this will download a PDF version of the bill in statement mode.
Email Invoice: allows you to email a copy of the bill to the customer - selecting this option will open a modal allowing you to choose the contact and the Bill Mode, “Invoice” or “Statement”, of the bill you'd like to send. Choosing “No Selection” will send the account default Bill Mode.
To access these options for an invoice:
1. Navigate into the “Billing” tab for the account
2. Click into the “Invoices” sub-tab
3. Locate the invoice in the list and click the downward arrow, adjacent to the “Edit” button.
Creating an Invoice
In Sonar, invoices can be created manually or as a result of automatic billing running. For invoices that are generated as a result of automatic billing, you will need to set when you want invoices to be generated and billing to run, among other settings; these can be configured within your billing defaults or through the individual account's billing configuration.
Manually Creating an Invoice
To create an invoice for an account manually:
- Navigate into the “Billing” tab of the account
- Click into the “Invoices” sub-tab
- Click “Add Invoice”
.png)
- From the Create Invoice modal, complete the required fields and click “Create”.

Expand this section for a detailed look at the fields within the Create Invoice window
Bilingual Invoices
Invoices can also be made available in French, at either a system-wide level or on an account-by-account basis. Both methods, and invoice examples of each, are provided below.
System-Wide Bilingual Invoices
Turning on bilingual invoices for the entire system will cause all bills that are generated in the system to have both French and English translations. Customers will still have one bill generated, but the document will contain the French version of the invoice (listed first), followed by the English version of the invoice.
An example of a bill (in invoice mode) that is generated with the system-wide bilingual invoices setting can be seen by expanding the section below, or can also be downloaded here: System-Wide Bilingual Invoice Example.
System-Wide Bilingual Invoice Example
Enabling System-Wide Bilingual Invoices
To enable bilingual invoices across the entire system:
- Navigate to Settings → System Settings.
- Scroll to the bottom of the System Settings page and check off the “Bilingual Invoices” field.
- Save your changes.

Accounts with Bilingual Invoices
In situations where you do not need to turn on bilingual invoices for the entire system, you have the option to turn this setting on for individual accounts instead. This means that bilingual invoices will not be generated for all customers, but will be made available to accounts where the associated primary contact has their language setting as “French”.
An example of a bilingual bill (in invoice mode) that is generated for an individual account can be seen by expanding the section below, or can also be downloaded here: Bilingual Invoice for Individual Account.
Bilingual Invoice for Individual Account Example
Enabling Bilingual Invoices for Individual Accounts
To enable bilingual invoices on an account by account basis:
- Navigate into the Contacts tab of the account.
- Click “Edit” for the primary contact.
- Ensure “French” is selected as the primary contact's Language field.
- Save your changes.

Past Due Stamps
Invoices can also have a “Past Due” stamp added to them once the invoice is delinquent. This would allow you to resend delinquent invoices and provide a visual notification to the customer that their invoice payment is past due and needs to be paid. When enabled, the Past Due stamp is applied universally across your entire instance and applies to all companies and customers.
Invoice Example
With the “Past Due Stamps” setting enabled, a watermark is displayed on any delinquent invoice. An example is included below or can be downloaded here: Invoice Example with a Past Due Stamp.
The “Past Due” stamp will only appear in English, regardless of whether bilingual invoices are enabled.
Invoice Example with a Past Due stamp
Enabling Past Due Stamps
To enable Past Due Stamps across your entire instance, you'll need to:
- Navigate to Settings → System Settings
- Scroll to the bottom of the System Settings and check the box for “Past Due Stamp”.

- Save your changes.