The Sonar Field Tech App

Written by Mitchell Ivany
Updated at March 13th, 2025
- Our Products & Services
- Getting Started
- Accounts
- Communication
- Billing
- Companies
- Financial
- Integrations
- Inventory
- Jobs
- Mapping
- Misc.
- Monitoring
- Purchase Orders
- Release Notes
- Sonar Billing
- Voice
- Reporting
- Security
- sonarPay
- Ticketing
- Working With the Sonar Team & Additional Resources
- System
- Networking
Table of Contents
.png)
The Sonar Field Tech app was designed for the purpose of streamlining workflow and eliminating obstacles commonly encountered by techs in the field, by providing a modern and flexible interface with everything you need to ensure customer satisfaction. With the Sonar Field Tech app, you can:
- Get fingertip access to inventory and simplify equipment assignment
- Make inventory adjustments on the fly with the in-app barcode scanner
- Access critical information and tools, whether online or offline
- View a complete overview of your jobs scheduled for the day
- Use the GPS route guidance to arrive on time and avoid delays
- Say goodbye to unnecessary paperwork and duplicate data entry
- And much more!
In this article we will take you through where the app can be accessed, how to set it up with your Sonar instance, and provide an overview of the different screens and features available to you.
An exception to this, however, is if the device is rooted (where you have super user permissions); in this scenario, the data could be viewed by the device user outside of the Sonar field tech app, but it would require that the user had rooted their phone before the Sonar field tech app was installed on their device.
Where to Get the App
The Field Tech app is currently available for both Apple and Android devices and can be downloaded from their respective app stores, or through the QR codes listed below.
Apple Device
Click here to navigate to the Apple App Store, or scan the QR code below with your Apple device.

Android Device
Click here to navigate to the Android App Play Store, or scan the QR code below with your Android device.

How to Set Up With Your Sonar Instance
Before technicians can begin using the Field Tech app, there are some administrative setup requirements that must be handled first; this includes creating a field tech instance user with the appropriate permissions, and ensuring jobs and schedules are configured and ready to use within your instance.
Jobs & Schedules
If you do not already have jobs and schedules configured in your instance, please start with this first. The "Resources for Jobs & Schedules" section can be expanded below to help guide you through any remaining configuration.
Resources for Jobs and Schedules
Field Tech User
In order for a technician to log into the Field Tech app, they will need a corresponding user with the necessary permissions to be created for them within your Sonar instance. Steps on how to create an instance user and apply a user role, as well as minimum permission requirements, are outlined below.
Creating a Field Technician Role
A role for the field technician app can be created either through the GUI within the Sonar instance or by using GraphiQL. Regardless of the method used to create the role, there are certain permissions that the field tech role must have in order to log in and access the mobile app. Expand each section below for steps to create a new role and the minimum permissions required for the role.
Permissions and Role Creation Steps Using GUI

Permissions and Role Creation Steps Using GraphiQL
Creating a New User & Applying the Role
To create a new user within your Sonar instance:
- Navigate to Settings > Security > Users
- Click "Create User" at the top of the screen
- Fill out the required fields within the Create User window. You must also ensure that the Enabled box is checked and that you also select the newly created field tech role from the Role drop down
- Click "Create"
How to Use the App
Below you will find a summary of the different screens within the mobile app, along with an overview of the features contained on the screen.
Jobs
The jobs screen contains all scheduled jobs that you have been assigned to and is available in either a list or map format.
List View
With the list view, the jobs are listed in chronological order with certain details visible for each job.

- Job Order: each job in the list has a corresponding number next to it, representing the order the technician will complete them in; the order is based off of the date/time that the job was scheduled for.
- Job Type: the job type of the scheduled job, based on the job types you have configured within your Sonar instance.
- Serviceable Address: the associated serviceable address where the job is scheduled to occur.
- Primary Account Contact: the primary contact of the account that the job is scheduled for.
- Start Time: the time that the job is scheduled to start at.
- Completion Time: the estimated time the job will take to complete.
- Tasks: the number of tasks associated with the job.
- Data Service: if the associated account has a data service applied to it, the name of the data service will be displayed here.
- Job Details: tapping anywhere within the job tile will navigate you into the Job Details screen; this is where all of the details for the job can be found, including any associated notes, tasks, or files, and also provides the ability to check-in and start the job. See the "Job Details" section below for further information.
- Driving Distance: the physical distance between consecutive jobs, based on the associated serviceable addresses for each job.
- Today: tapping on "Today" will restrict the job list to only show jobs scheduled for the current day.
- Later: tapping on "Later" will make the list display jobs scheduled for the current day and also jobs scheduled for future dates.
- Date: tapping on the displayed date will open a calendar that allows you to select a different date to jump to; using the arrows on either side will navigate you to the jobs list view for the specified date, where you can view that day's currently scheduled jobs.
- Map: the map button will switch you to the map view of the jobs screen, where the scheduled jobs are displayed on a map, instead of a list. See the "Map View" section below for further information.
Map View
With the map view, the jobs appear as pins on the map, based on their associated serviceable address.

- Your Location: tapping on the button here displays your current physical location on the map.
- Job Location: every scheduled job appears as a pin on the map, based on the associated serviceable address; lines will automatically be drawn between each job destination, representing the order they will be completed in, based on the jobs' start times. Tapping on a job pin will display a details box with a few key details for the job.
- Job Details: tapping on a job pin opens a details box where you can view the job order number, job type, and start time. Tapping anywhere within this details box will navigate you into the Job Details screen; this is where all of the details for the job can be found, including any associated notes, tasks, or files, and also provides the ability to check-in and start the job. See the "Job Details" section below for further information.
- Zoom In/Out: the "+" and "-" buttons can be used to zoom in and out of the map.
- Today: tapping on "Today" will restrict the map to only show jobs scheduled for the current day.
- Later: tapping on "Later" will make the map display jobs scheduled for the current day and also jobs scheduled for future dates.
- Date: tapping on the displayed date will open a calendar that allows you to select a different date to jump to; using the arrows on either side will navigate you to the jobs map view for the specified date, where you can view that day's currently scheduled jobs.
- List: the list button will switch you to the list view of the jobs screen, where the scheduled jobs are displayed as a list, instead of on a map. See the "List View" section above for further information.
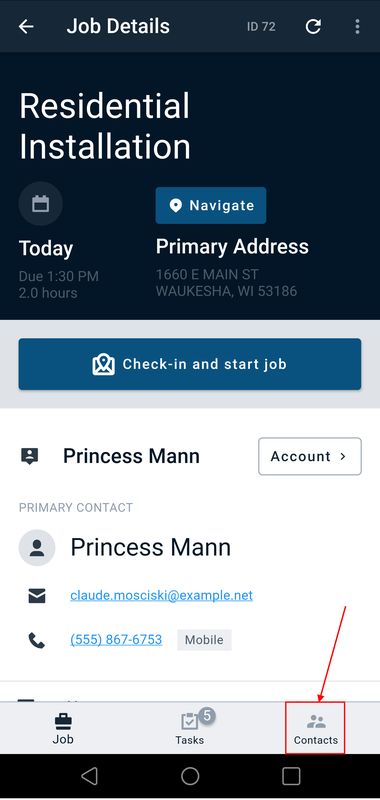
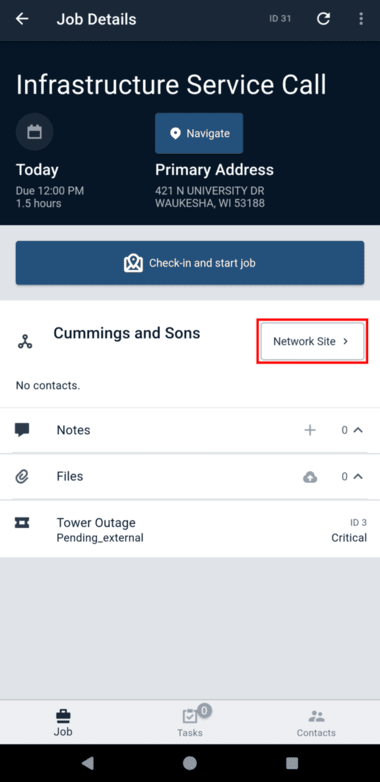
Job Details
This screen provides key information for the technician, such as details of the job and the entity the job is for, while also providing options to navigate to the job site as well as check-in and start it.
.png)
- Job Type: the job type of the scheduled job, based on the job types you have configured within your Sonar instance.
- Time & Duration: the date the job is scheduled for, the time that the job is expected to be completed, and the estimated job duration.
- Primary Address: the serviceable address that the job is scheduled to take place at.
- Navigate: tapping here will open this location via Google maps, providing the option to obtain directions and begin navigation to the job destination.
-
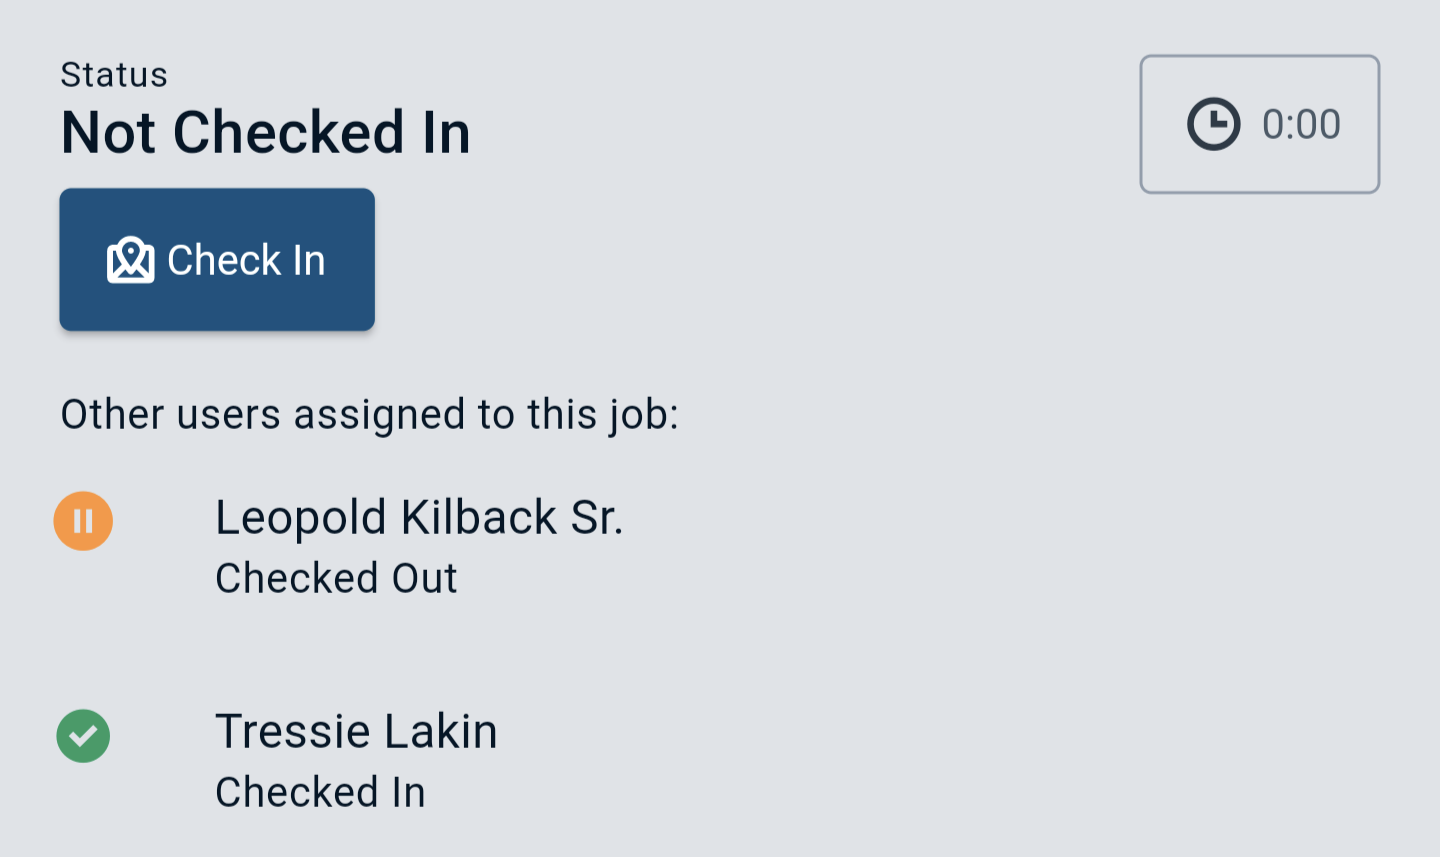
Check-in: tapping on the "Check-in" button can be used to start the job once the technician arrives and is ready to begin.
- Once checked in, the job status will update to "In Progress", a visible timer will be started, and the following additional options will become available to the technician from this page:
.png)
- Check Out: using this button will check the technician out of the job, pausing the work timer. This will update the job status to "Checked Out" and the option to Check In will reappear.
- Complete Job: using this button will prompt the tech to enter in any relevant job notes and mark the job as successfully completed.
- Fail: if the tech is unable to complete the job successfully, they can use the "Fail" button which will prompt the tech to enter in any relevant job notes regarding the failure, and mark the job as failed.
- Once checked in, the job status will update to "In Progress", a visible timer will be started, and the following additional options will become available to the technician from this page:
Check-In with Multiple Techs

- Custom Fields: any custom fields with filled-out details on the job will be shown here for quick reference.
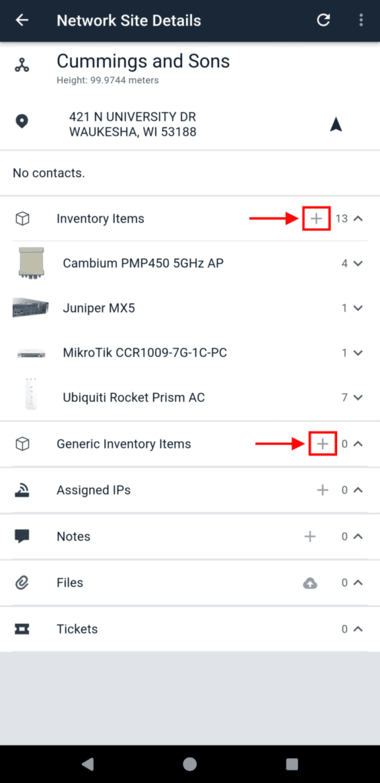
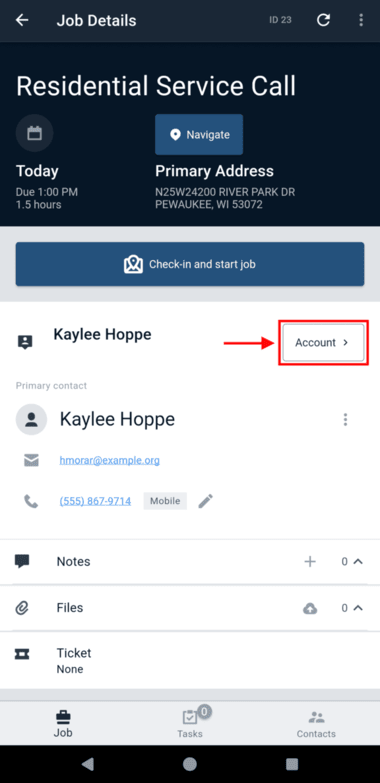
- Entity: the name of the entity that the job is scheduled, being either an account or a network site.
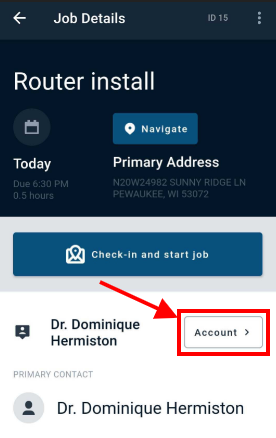
- Entity Details: this button will reflect "Account" or "Network Site", depending on the entity the job was scheduled for; tapping here will take you into a details page for the entity where all of their information is contained and many additional actions are available.
- Primary Contact: this section contains the details of the entity's associated primary contact, such as the name, email address, phone number, and phone number type.
- Job Services: all services that are associated with the job type and will be added to the account upon successful job completion.
- Notes: job notes can be viewed, modified, and created in this section. The number next to the downward arrow will display the total number of notes on the job, and tapping the arrow will expand the list so the notes are viewable; from here you can edit or delete existing notes, and view further details for it (such as when it was created and by which user). A new note can be created for the job by using the "+" button.
- Files: relevant job files can be viewed and uploaded here; the number next to the downward arrow will display the total number of files associated with the job, and tapping the arrow will expand the list so the files are viewable; from here you can edit, remove, or download existing files. Additional files can be uploaded using the cloud/arrow button.
- Ticket: If the job is associated with a ticket, then the name of the ticket, ticket status, ticket priority, and the ticket ID will be displayed here. Tapping on the ticket will navigate you into the Ticket Details page, where additional information for the ticket can be viewed.
- Job: tapping here will navigate you into the main Jobs screen. See the "Jobs" section above for more information.
- Tasks: the total number of incomplete tasks for the job will be displayed here; tapping this button will navigate you into a screen where you can view all of the job tasks and mark them as complete once they have been taken care of.
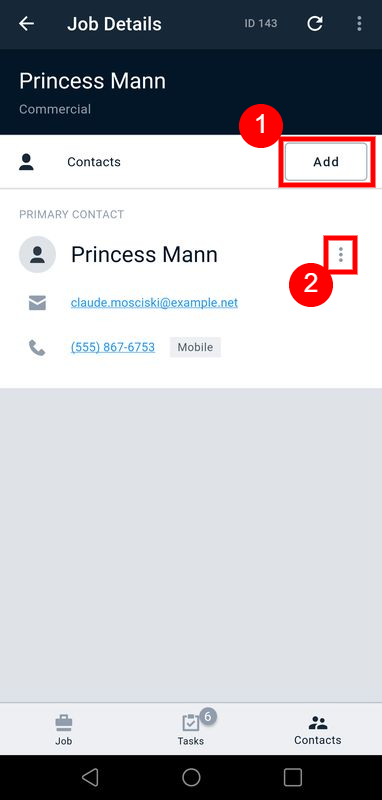
- Contacts: tapping this button allows you to view the entity's associated contacts; from here you can view which contact is the primary, if multiple contacts are present, as well as the email address and phone number for each contact.
Inventory
The Inventory screen will display all inventory in the instance that is currently not assigned to a serviceable address. This includes inventory assigned to the specific technician, Inventory Locations, Generic Assignees, Vehicles, and other Users.
.png)
- Search: this section allows you to enter any combination of device ID, MAC Address, Serial Number, Location name, or Device Model. It also supports partial matching and multiple search categories simultaneously. For example, searching "5" will list items with matching IDs, MACs, SNs, or location names.
.png)
- Scan: this allows you to use your mobile device's camera to scan device barcodes or QR codes in order to locate the item within the Inventory screen.
-
View switching: this section allows you to switch the inventory view between a list organized by location of the item(s) to one organized by the inventory model of the item(s).
-
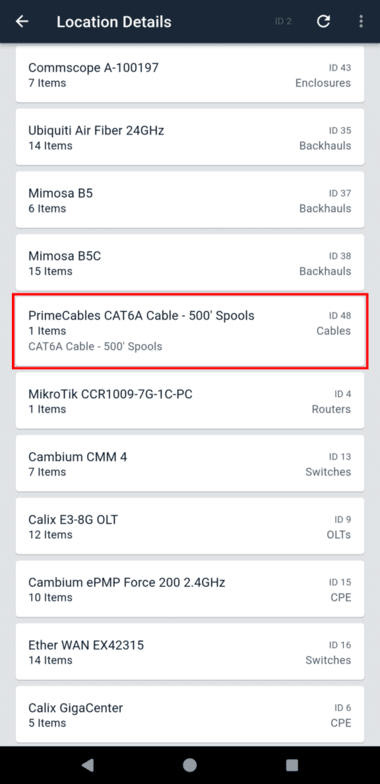
By Location: this view, pictured below, lists out every inventory location, except serviceable addresses, that can have inventory assigned. These locations will be listed even if no items are currently assigned:
.png)
-
By Location: this view, pictured below, lists out every inventory location, except serviceable addresses, that can have inventory assigned. These locations will be listed even if no items are currently assigned:
-
By Model: this view, pictured below, lists all available inventory in your instance. Models will be displayed even if there is no available inventory belonging to that model:
.png)
- The Inventory List will allow you to explore available inventory items and view their details. Each listing allows you to drill down to view more information, eventually reaching the inventory item details screen:
.png)
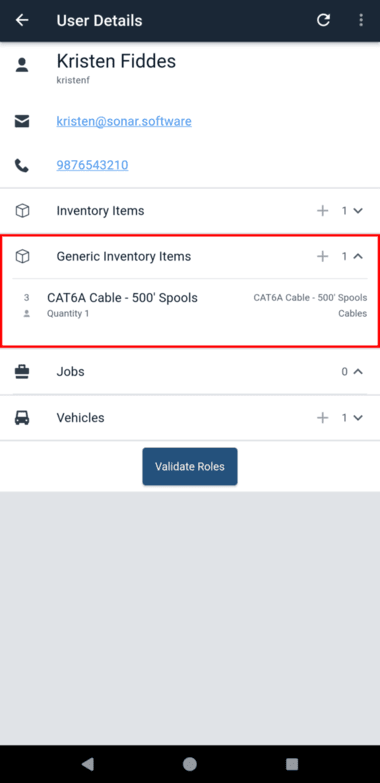
User Details
This is where you can view the details relevant to your individual user, including inventory items, jobs, and vehicles.

- Full Name: the full name of the user.
- Username: the username that is used to log in to the Sonar instance and mobile app.
- Email Address: the email address of the user.
- Phone Number: the phone number of the user.
- Inventory Items: this area represents inventory items that are assigned to the individual tech; tapping on this section will expand the inventory items list, where further details for each inventory item can be viewed.
-
Add Inventory Items: this populates a new modal that allows you to assign inventory, either by manually typing information such as the MAC Address or serial number, or by using the Scan feature.
.png)
-
Number of Items: the total number of inventory items assigned to the technician.
- When the list is expanded, you can see details such as the inventory item ID and name, the number of IPs assigned to it, the MAC address, the primary unique identifier (i.e., serial number), and the inventory category it falls under. Tapping on any item in the list will navigate you into the item details view for that specific piece of inventory.
- Generic Inventory Items: this area represents generic inventory items that are assigned to the individual tech; tapping on this section will expand the inventory items list, where further details for each inventory item can be viewed.
- Add Generic Inventory Items: this populates a new modal that allows you to assign inventory, either by manually typing the identifying name of the item, or by using the Scan feature.
- Number of Items: the total number of generic inventory items assigned to the technician.
- Jobs: this area contains information for jobs that the technician has been assigned to; tapping on this section will expand the jobs list, where further details for each job can be viewed.
-
Number of Jobs: the total number of jobs the technician has been assigned and scheduled for the current day.
- When the jobs list is expanded, a summary of details will be visible for each job - this includes the job ID, job type, entity the job is for, the scheduled date and time, and the job status. Tapping on a job in the list will navigate you into the job details view for that job.

- When the jobs list is expanded, a summary of details will be visible for each job - this includes the job ID, job type, entity the job is for, the scheduled date and time, and the job status. Tapping on a job in the list will navigate you into the job details view for that job.
- Vehicles: this area contains information for any vehicle(s) that the technician has been added as a driver for; tapping on this section will expand the vehicles list, where further details for the vehicle can be viewed.
-
Additional Vehicles: tapping on the "+" button will open up the list containing all available vehicles.
- If the technician has been given the minimum permissions (outlined above), this list will serve as a read-only list of available vehicles, which can be used to view the inventory item details for each vehicle's inventory.
- If the technician has been given the optional permission to update vehicle drivers ("Update the drivers of a vehicle" under the 'Misc' permissions), the "+" button will allow the tech to add/remove themselves as drivers for the vehicles.
- Number of Vehicles: the total number of vehicles that the technician is currently added as a driver.
- Stop Using: Pressing this will remove the techician as a driver of the vehicle.
- Validate Roles: Super-Admins accessing the Sonar Field Tech app will have this additional button, which allows you to log in and confirm which roles in your instance meet the permission requirements for access to the Sonar Field Tech app.
Alerts
This screen will display any notifications that are a result of alerting rotations.
Offline Queue
No data service? No problem! The field tech app can be used in either online or offline mode. If your connection is lost, all changes performed while offline will be stored in the offline queue; these changes will automatically sync once the connection is restored.
When service is not present, an orange banner will appear at the top of the app screen, indicating that the server is unavailable and offline mode is enabled. As the user continues to make changes within the app, the "Offline Queue" banner will appear at the bottom of the screen, displaying the total number of changes made in offline mode that are currently queued.

Tapping on the "Offline Queue" banner will open the Offline Queue screen, where the pending changes can be viewed. If the change can be removed from the offline queue, a garbage bin icon will be present next to the queue item. Tapping on the garbage bin icon will allow the user to remove that item and all subsequent items from the offline queue, preventing the change(s) from being automatically synced once the connection is restored.

Currently, there are a few actions that the mobile app does not support in offline mode:
- adding customer payment methods
- taking a customer payment
- completing tasks that have a completion requirement
- loading the next available IP address, when assigning IPs
Reporting App Issues
If you encounter unexpected behavior while using the Sonar Field Tech app, issues and bugs can be reported directly through the application. This ensures all relevant details are captured alongside the behavior. You can report a bug from any page by:
- Tap on the 3-dot menu in the top-right, and from the options that appear, select “Report a bug”
.png)
- This will shrink the page UI, and display the bug reporting interface, which is formed of 3 steps. In the first step, provide some details about the error that was experienced.
.png)
- In the second step, screenshots can be added to the bug report. Tap the “Add Screenshot” button to open the capture page.
.png)

- Once your screenshots are captured, they'll automatically be attached to the report once you tap on "Next"
- Screenshots that are added can be removed by tapping on the trashcan icon, and additional screenshots can be added by tapping the "+" icon.
.png)
- Screenshots that are added can be removed by tapping on the trashcan icon, and additional screenshots can be added by tapping the "+" icon.
- In the final step, you provide a contact email address. The address entered here will receive updates on the submitted issues, such as workarounds, or be contacted once the issue is resolved. Tap “Next” once the correct email address is entered.
.png)
- Finally, with all information filled out, confirm the issue submission by tapping the “Submit” button.
.png)
Residential Installation Process Flow Example
Outlined below is a summary of the typical workflow that a technician would encounter during a residential installation for a customer.
- Start the day by logging into the Sonar field tech mobile app. Navigate into the User Details screen to quickly view the list of jobs for the day; also scan the Inventory Items list to ensure we have the equipment needed for today's jobs, and review the inventory available in the assigned vehicle.

- Navigate into the map view of the Jobs screen, and view the first job location.

- Review the job details for the first job, including any associated tasks or relevant notes. Once we are ready to go, we use "Navigate" to head to the job location.

- Once at the job location, we use the "Check-in and start job" button to start the clock and get begin working.


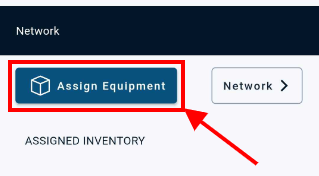
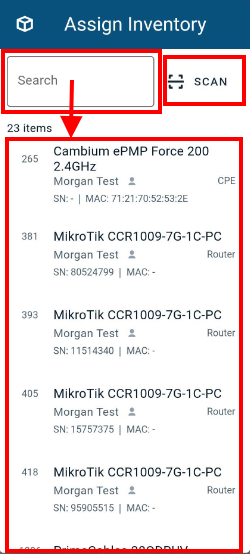
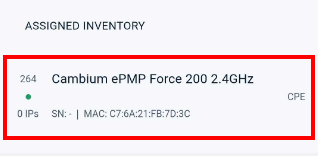
- Using the Inventory Items list, we find the piece of equipment that we will assign to the customer's serviceable address, and assign it to the customer using the "Assign Equipment" button.


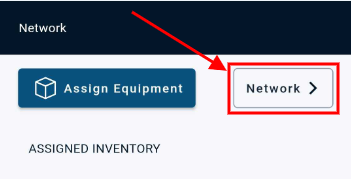
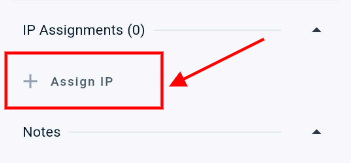
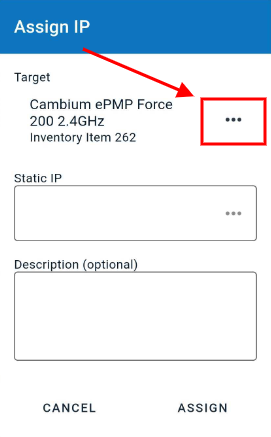
- Next we complete our provisioning work and assign an IP address to the device, by navigating into the network details screen.


- Once our work at the residence is completed, we take a photo of the CPE and it's location, and upload it as one of our required job tasks.

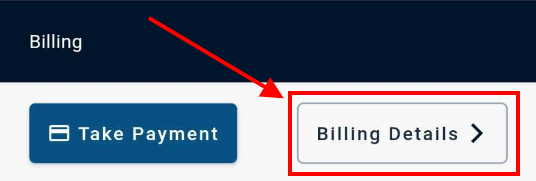
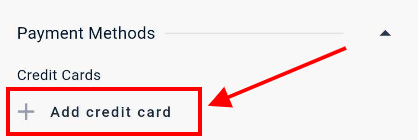
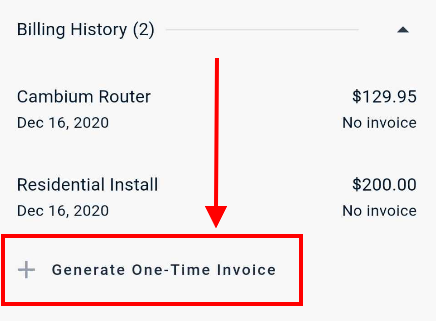
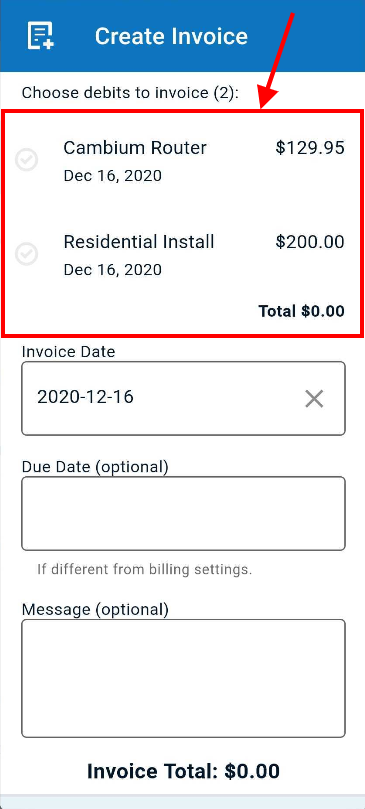
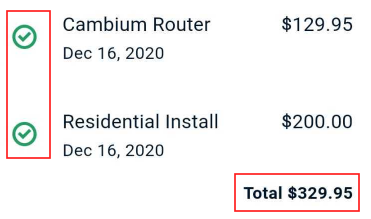
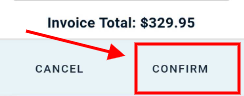
- Navigating into the Billing Details screen, we generate a one-time invoice for the customer so that they can pay while on-site. From the same screen, we add the customer's payment method to their account and use it to take payment for the installation fee.


- Once we are ready to leave the customer premises, we ensure all of our job tasks have been closed out, and we use the "Complete Job" button to stop the timer and mark the job as finished.

- Navigating back to the Jobs list view, we can see our completed job marked in green and can now move on to our next job of the day.

How-To Guides for the Mobile App
Below you will find several guides that provide directions for performing various actions through the Sonar field tech mobile app; expand any of the sections below to view their step-by-step details.
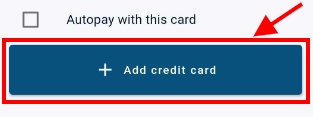
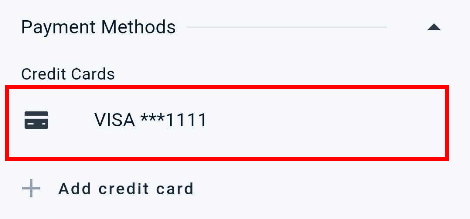
Add a Credit Card as a Customer Payment Method

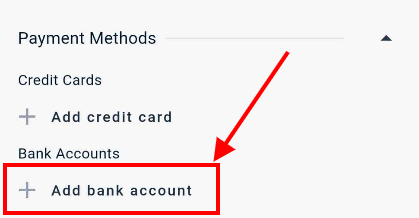
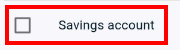
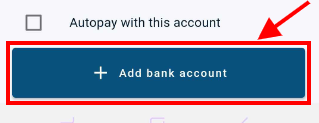
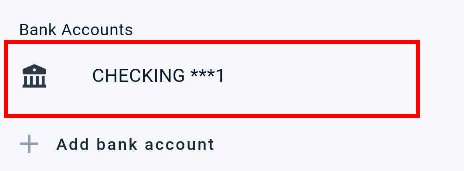
Add a Bank Account as a Customer Payment Method

Assign Equipment to an Account
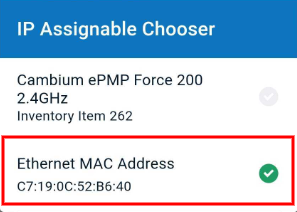
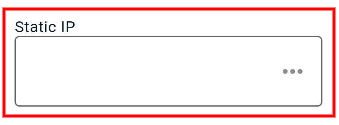
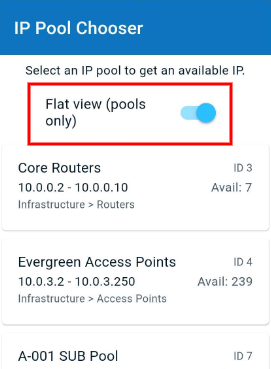
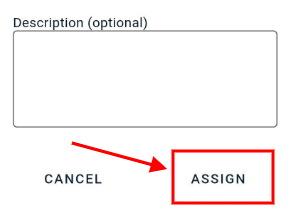
How to Assign IP Addresses

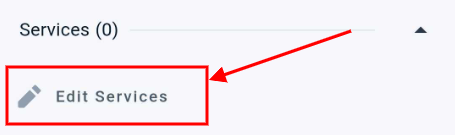
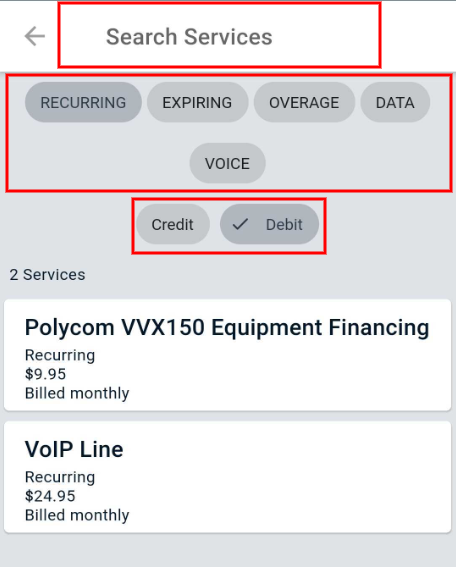
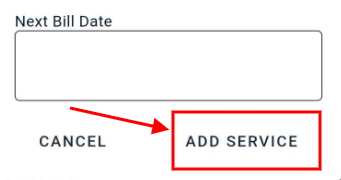
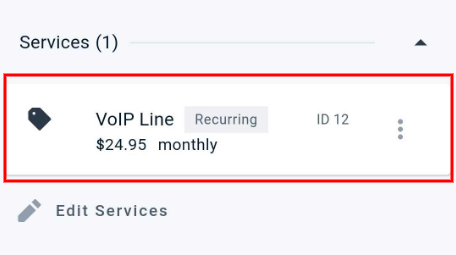
How to Add a Recurring/Expiring Service to an Account

How to Generate a One-Time Invoice

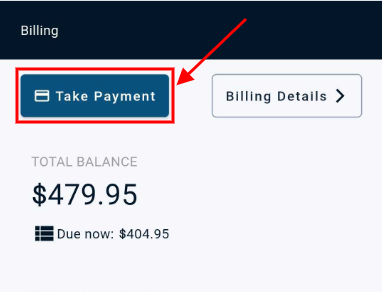
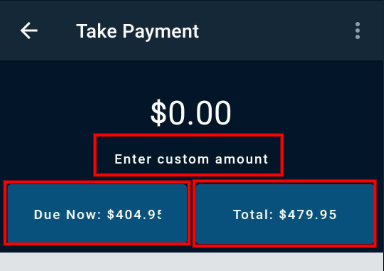
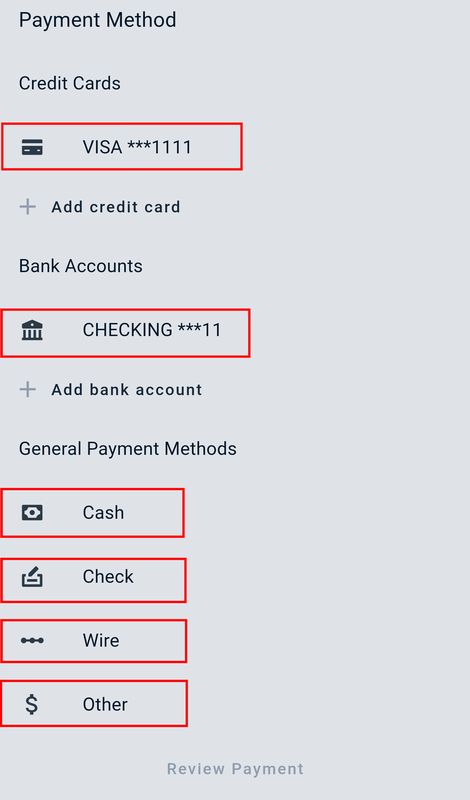
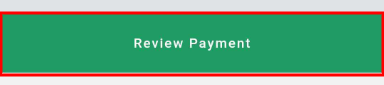
How to Take a Customer Payment
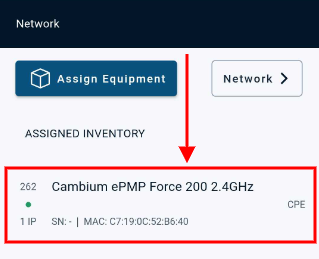
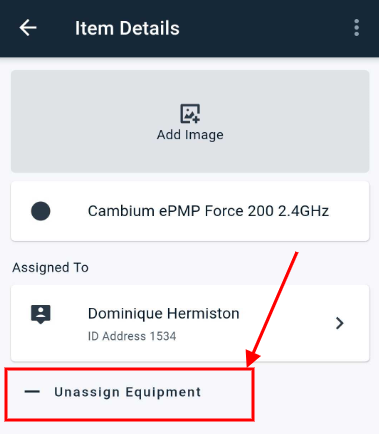
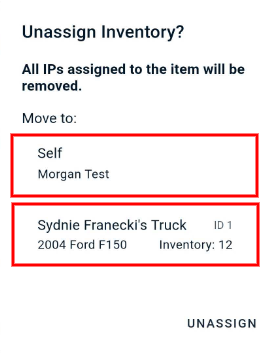
How to Unassign Equipment From an Account
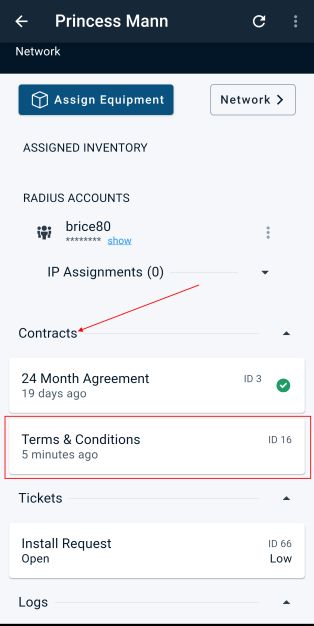
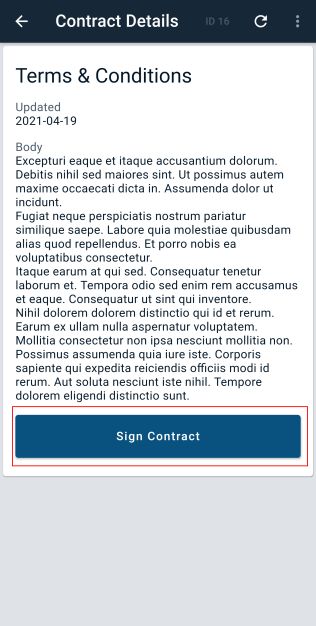
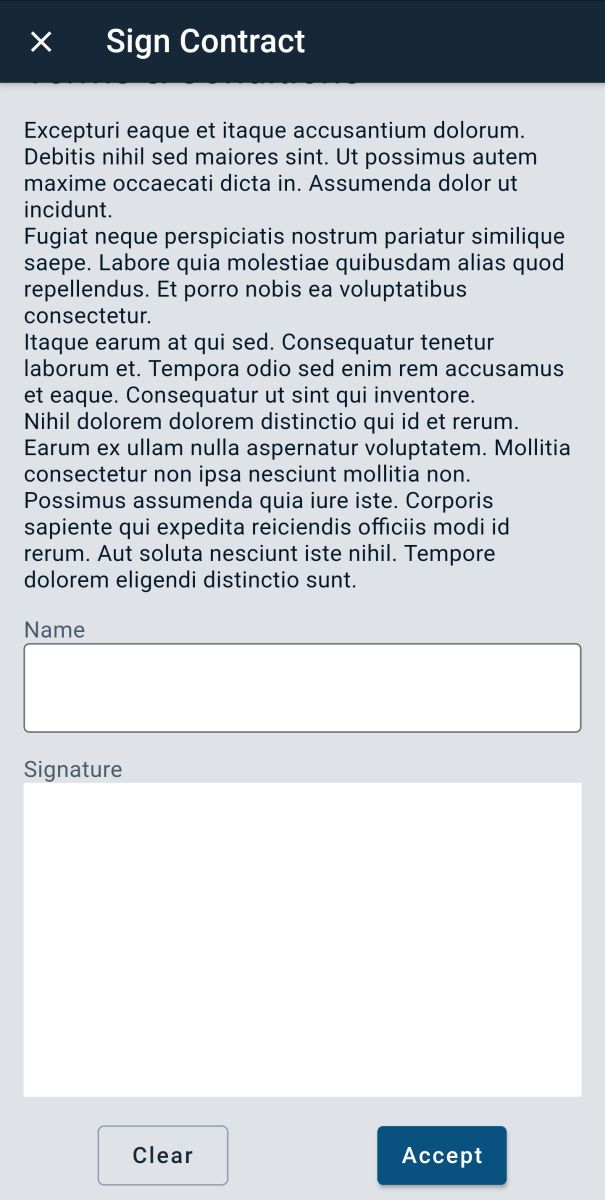
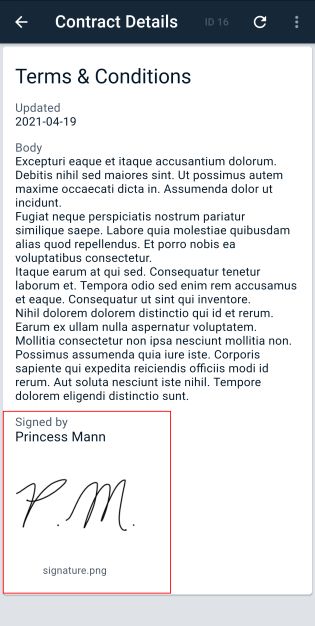
How to View and Have a Customer Sign a Contract


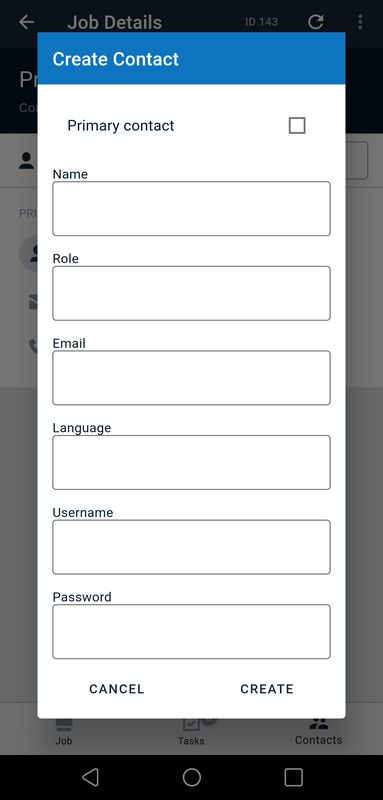
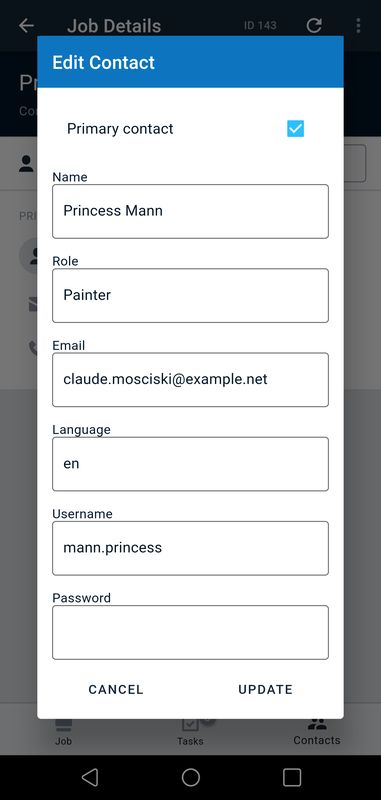
How to Add and Update Customer Contacts
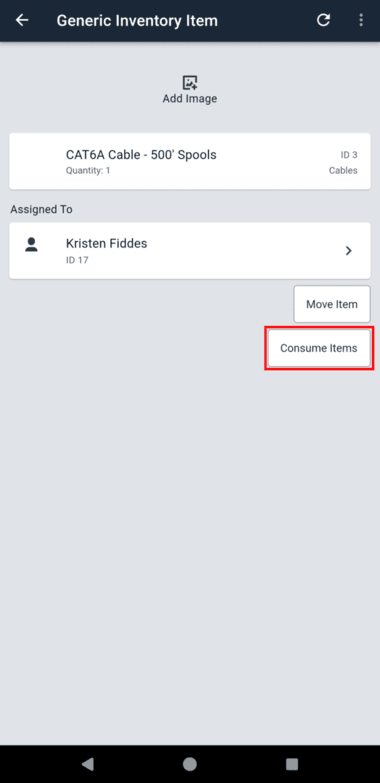
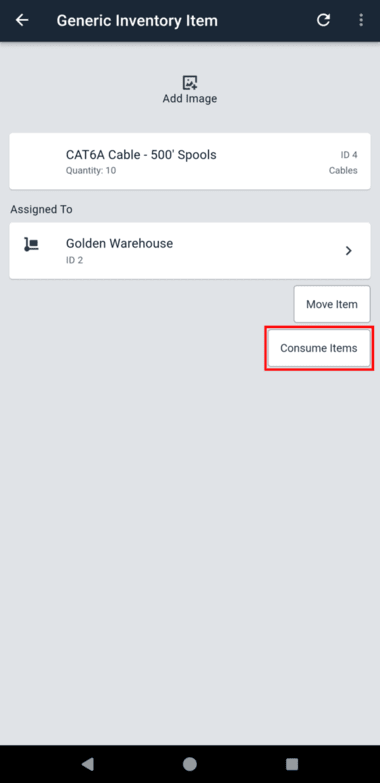
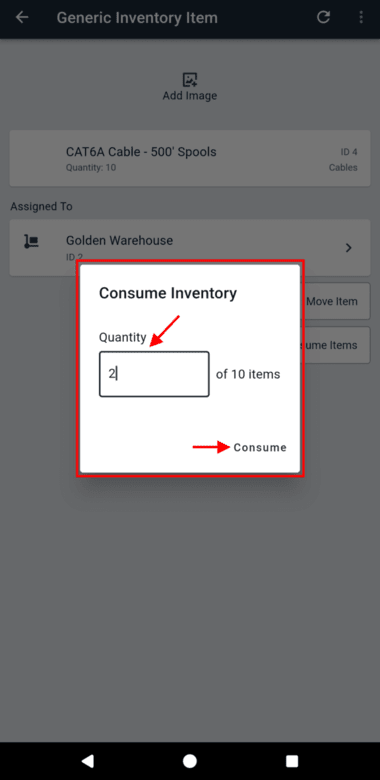
How to Consume Generic Inventory

How to Assign Equipment to a Network Site
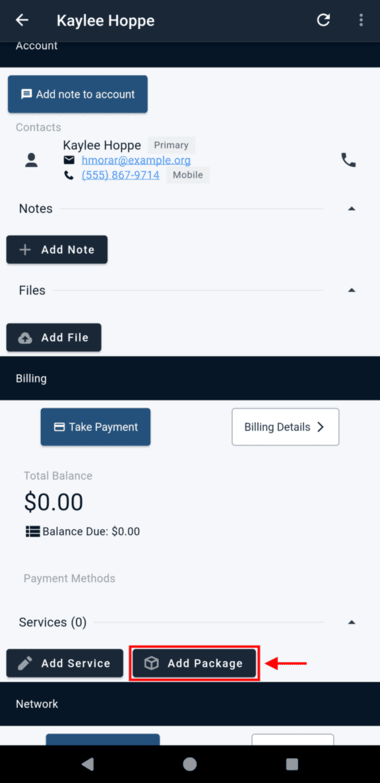
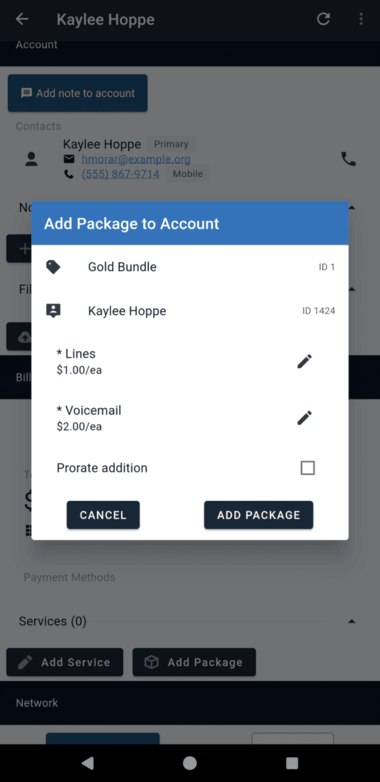
How to Add Packages to an Account
Version History
A complete changelog for the different versions of the Sonar Field Tech Mobile App can be found here | Sonar Mobile App Version History