Sonar Billing: Overview

Written by Mitchell Ivany
Updated at March 13th, 2025
- Our Products & Services
- Getting Started
- Accounts
- Communication
- Billing
- Companies
- Financial
- Integrations
- Inventory
- Jobs
- Mapping
- Misc.
- Monitoring
- Purchase Orders
- Release Notes
- Sonar Billing
- Voice
- Reporting
- Security
- sonarPay
- Ticketing
- Working With the Sonar Team & Additional Resources
- System
- Networking
Table of Contents
Sonar Billing offers the ability to update your credit card information with Sonar, view previous transactions, access invoices for both your instance fees, and your Print to Mail and SMS transactions.
Permissions
In order to view Sonar Billing within your instance, the corresponding role permissions must be enabled first. Please take a moment to review these permissions, and ensure that the relevant roles have them added before proceeding.
Navigate to Settings → Security → Roles and either choose to edit an existing Role or create a new Role. When the next page populates, locate the permissions reflected in the screenshot below and enable whichever ones are applicable to that Role.

Overview
The information displayed on the Overview page of Your Sonar Account will depend on a few variables:
- The information displayed underneath Payment Details depends on whether you've previously set a credit card to autopay for your instance fees. If you have added a credit card through our team, but declined to set it to autopay, the card will not display here.
- The Print to Mail section reflects any available funds; this amount is separate from any upcoming instance fees. If not enabled, you have access to set up this option by selecting “View Print to Mail settings”. For more information on Print to Mail, please review this linked article.
- The SMS section reflects any available funds; this amount is separate from any upcoming instance fees. If not enabled, you have access to set up this option by selecting “View SMS settings”. For more information on SMS, review the SMS Notifications and Using Outbound SMS articles.
-
Recent Transactions provide a brief snapshot of the latest transactions regarding your instance, Print to Mail, and SMS. To view a list of all transactions, simply navigate to the Transactions tab in the column to the left.

Payment Details
This section allows you to manage your credit card that is associated with your Sonar billing. If you haven't provided a credit card, or need to adjust it or even replace it, you can do so in this section.
Adding a Credit Card
To add a credit card to your Sonar billing, you would click Add Credit Card under the Payment Details section, and input the applicable card details. Once added, the card is automatically set to Autopay and is ready to be used for invoice payments and Print to Mail or SMS transactions.

Updating a Credit Card
Under the Payment Details section, click the Edit button within the credit card image. This will open a new window allowing you to modify the card.
Edit Credit Card Window
How to Add Funds for Print to Mail or SMS
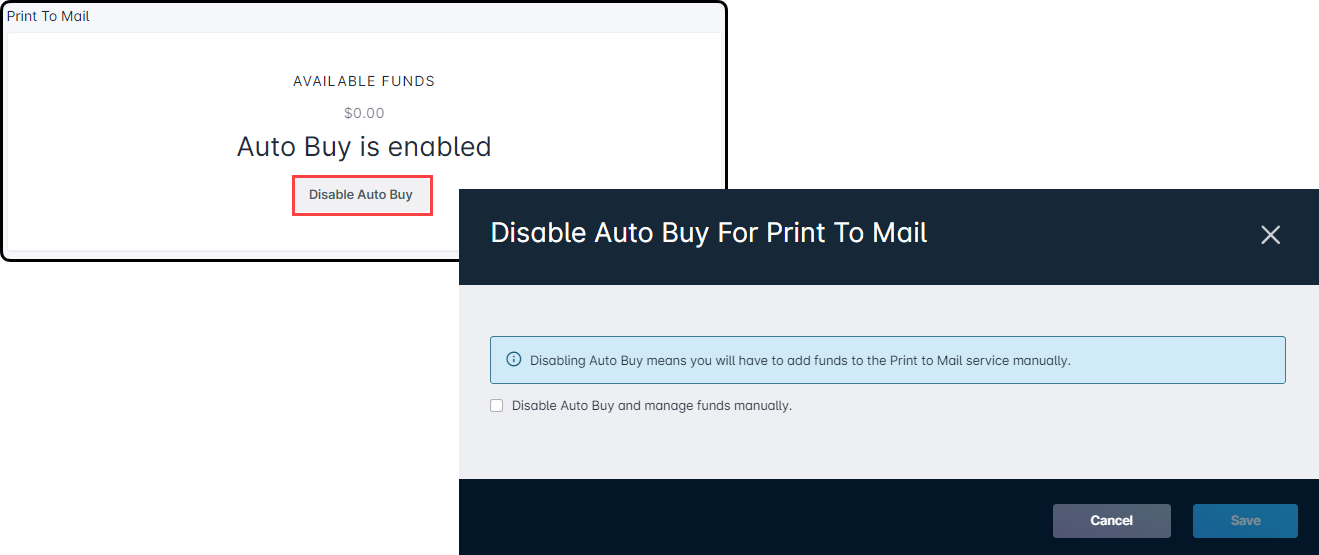
When it comes to enabling Print to Mail or SMS notifications, you have two options for how funds are added to your instance. You can Enable Auto Buy or Add Funds manually. Whether you select to Enable Auto Buy or Add Funds manually, Sonar will charge the card you have on file.

Enabling Auto Buy
Clicking on the Enable Auto Buy button on either feature will open a pop up modal, which will give you the option to enable the Auto Buy feature. Clicking the Enable Auto Buy check box, then selecting Save, completes this setup.

Details on How to Disable Auto Buy
Adding Funds
Adding Funds is a manual process. Selecting the Add Funds button on either Print to Mail or SMS will open a pop up modal, which allows you to enter the amount you would like to add to your instance for that feature. There is a minimum of $10 that can be applied at a time.

Invoices
Navigating to the Invoices tab, in the column to the left, displays your instance invoices and any created for Print to Mail or SMS transactions. Each line item displays the invoice number and some basic details about the invoice, such as the date and amount; you're able to save a further breakdown by clicking Download Invoice on the corresponding line item.

For more information on how Sonar bills your instance, please review this linked article.
Transactions
The Transactions tab provides a full view of all transactions processed for your instance and the Print to Mail or SMS features. With each line item, you're able to identify the date the transaction took place, the transaction title and the total amount processed.
![]()
To view the details of a particular transaction, click on the transaction's date (located under the DATE column) – doing so will expand the selected transaction and provide you with additional inner tabs that you can cycle through.